Migrating Emails to CloudMail
Mailbox migration can be summarized in the following steps:
- Lowering TTL for MX DNS records (e.g. 300)
- First synchronization
- Changing DNS MX record
- Differential synchronization
The TTL for the domain's MX record must be lowered in advance, so that the subsequent MX record change can propagate as fast as possible. Once the emails are migrated and the functionality verified, the TTL can be increased again.
To avoid problems with certain e-mail clients, make sure that the imap.*, smtp.* and pop3.* DNS records do not point to the old location, but to Cloudmail! Some clients use these records as default addresses to connect to, and would therefore connect to the old location.
- imap.* mda.vshosting.cloud
- smtp.* msa.vshosting.cloud
The length of the synchronization depends on the size of the migrated mailboxes. After its completion, the MX records can be changed. After the new records propagate, perform the synchronization again to migrate the remaining messages.
How does it work?
Our synchronization tool is intended for migrating mailboxes to Cloudmail and can be found at https://mailsync.vshosting.cloud/form. It requires an administrator account and passwords to the original mailboxes. When using it, the necessary mailboxes will be created on CloudMail using the same password as for original mailbox.
The home page looks like the image below:
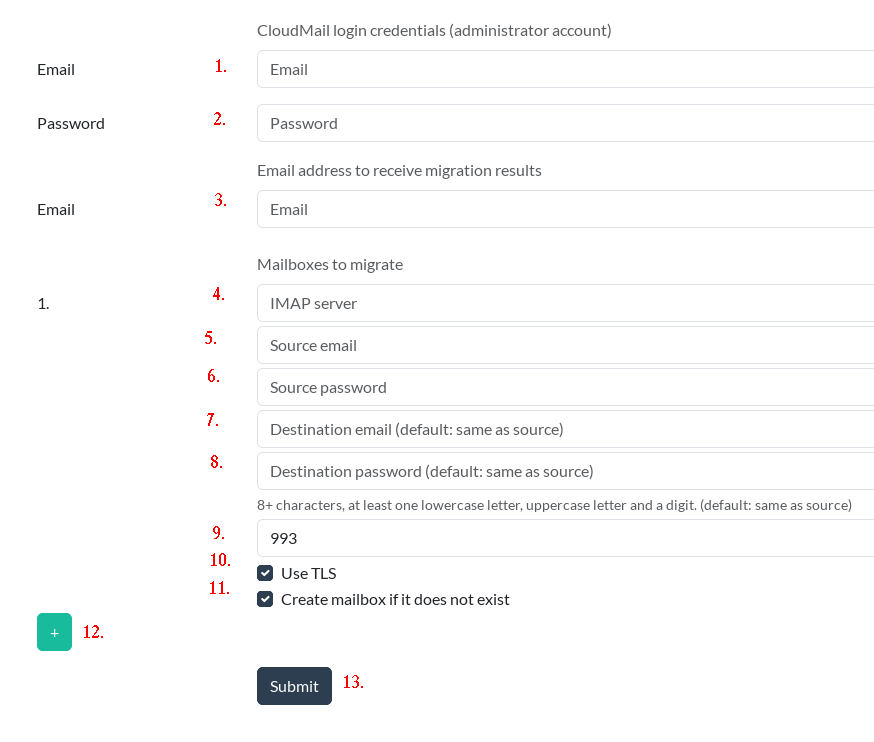
First, fill in the section "CloudMail login credentials (administrator account)". Here you need to enter the administrator account (1) and password (2) to access the CloudMail administration.
In the "Email address to receive migration results" section, enter the email (3) where migration results will be sent.
In the "Mailboxes to migrate" section, fill in:
- IMAP server (4) - source IMAP server address
- Source email (5) - email on the source server
- Source password (6) - source mailbox password
- Destination email (7) - target email on CloudMail (default: same as source)
- Destination password (8) - target mailbox password (default: same as source). Password must be 8+ characters, at least one lowercase letter, uppercase letter, and a digit.
- Port (9) - source IMAP server port (default 993)
- Use TLS (10) - check to enable secure connection
- Create mailbox if it does not exist (11) - check to create the mailbox on CloudMail if it doesn't exist
If you want to add another mailbox to the migration, use the plus button (12) and fill in the necessary data.
Confirm by clicking the "Submit" (13) button.
When the migration is completed, an email with the resulting status is sent to the aforementioned administrator account. If it is a temporary account, then it is possible to use the web interface for accessing the mailbox. You can also track the migration status in the web interface - a link to the status page will be displayed after submitting the form.
Migration status
After starting the migration, the user is offered a link where they can monitor the migration progress, pause it, and download logs containing details about the migration of individual mailboxes.

Logs
After clicking the Download Log button, the browser will start downloading a zip file containing several logs from individual migration steps. When troubleshooting errors, the most recent log is usually the key one (file names contain the time of creation).
Migrate multiple mailboxes using CSV
If you need to migrate a large number of mailboxes, you can enter the data in a CSV file in the following format:
source_server,source_user,source_password,source_port,source_tls,target_user,target_password,create_mailbox
- source_server - the address of the source IMAP server
- source_user - username on the source IMAP server
- source_password - password of user on the source IMAP server
- source_port - port on the source IMAP server (993/143)
- source_tls - true / false value, whether you want (or must) use secure connection to the IMAP server
- target_user - username (mailbox) on Cloudmail
- target_password - password of user on Cloudmail - 8 or more characters, at least one lowercase letter, uppercase letter, digit.
- create_target_mailbox - true / false value, create a mailbox on Cloudmail if it does not exist
Example:
imap.example.com,user@example.com,password123,993,true,user@example.com,xahtaiTeemieF5eeCaed,true
IMAPSYNC Tool
As an alternative to our tool, you can use the open-source tool IMAPSYNC, also available on GitHub.
We do not offer any support for this tool – any migration performed with it is entirely at your own discretion.
Please note that this is a third-party program. We are not responsible for any issues arising from its use, data loss, bugs in the software, or any potentially malicious code. For the online version, also consider the risk of password interception and e-mail logging.
Migration by support
If you would like us to perform the migration for you, this service is charged at 100 CZK per mailbox. To arrange the migration, please contact support.