What is CDN
When the customer visits the web application, the browser must download all the files to which the visited page refers, if the customer is remote from your web server, this can cause a long delay when loading the website.
Our CDN has cache servers located in different locations, and if you use a CDN, customers do not have to download static content from your remote web server, but are served from a cache server that is located much closer to them, and the loading of the website is much faster thanks to this.
The main advantages of CDN are therefore:
- Faster website loading for customers.
- Reducing the load on your web servers.
- Partial protection against DDoS attacks.
Localities
We now have Europe, USA and Global locations available. For Europe, there are two locations in Prague and one location in London, Madrid and Bucharest. In the case of the USA, then New York.
When choosing a site, it is necessary to think about the fact that all traffic that goes through the CDN domain/alias must go through this site. In the case when the US location is selected, it happens that all visitors are checked in via this location, not that the CDN is active only in the selected location. So if the visitors are mainly from Europe, choosing US is probably not a good choice.
Commissioning of the service
- When you create a CDN service, you are given a CDN domain through which you must direct the loading of static content, for example, if you want to use a CDN for the website example.com, the domain example.vshcdn.net will be created for you.
- Web developers will modify static content links, replace example.com with example.vshcdn.net.
- The CDN itself, thanks to anycast technology and specially configured DNS servers, ensures that the web user's browser always downloads static content from the nearest server.
List of server IP addresses
Currently, the CDN can load content from your servers from the following IPs:
93.185.110.99/32
93.185.110.100/32
93.185.110.101/32
185.198.191.147/32
204.145.66.226/32
77.81.119.26/32
86.105.155.150/32
185.115.0.0/24
77.247.124.1/32
46.243.53.13/32
Or the following IPv6 addresses:
2a05:91c0:504::4571/128
2a00:1d70:ffff:ffff:ffff:ffff:ffff:1/128
2a00:1ed0:0:213::11/128
2a00:1ed0:0:213::12/128
2a00:1ed0:0:213::13/128
2a0a:54c0:0:34::2/128
2001:1980:5102:ea82::2/128
2a02:5420:1::/48
2a00:1ed0:3:1::6/128
2a00:1ed0:3:2::6/128
2a00:1ed0:3:3::6/128
2001:1980:5102:ea84::6/128
2a05:91c0:504:4571::11/128
2a00:1d70:a002::11/128
2a0a:54c1:28::6/128
2a0a:54c1:29::6/128
2a00:1ed2:1::13:1/128
2a00:1ed0:3:1::101/128
2a00:1ed0:3:2::101/128
2a00:1ed0:3:3::101/128
2001:1980:5102:ea84::101/128
2a0a:54c1:28::101/128
2a0a:54c1:29::101/128
IP addresses can change over time, you can also obtain the ip list using a GET request on the url of the list of server IP addresses, in this case you will be returned a list of ip addresses where the separator used is '\n' (new line). Both lists can be found at the following links:IPv4 and IPv6
Script for downloading the IP address list
For automatic downloading and formatting of CDN server IP address lists, you can use the helper bash script vsh-cdn-wblist.sh.
The script supports the following output formats:
nginx_allow- generates allow directives for nginxnginx_deny- generates deny directives for nginxapache_allow- generates Require ip directives for Apacheapache_deny- generates Require not ip directives for Apachenginx_realip- generates set_real_ip_from directives for nginx with CDN-VSHOSTING-Real-IP headerapache_rpaf- generates RPAF module configuration for Apacheraw- returns raw list of IP addresses
Usage:
./vsh-cdn-wblist.sh <file_type> <output_file> [tmp_file]
Example for nginx realip configuration:
./vsh-cdn-wblist.sh nginx_realip /etc/nginx/cdn-realip.conf
Example with atomic write:
./vsh-cdn-wblist.sh nginx_realip /etc/nginx/cdn-realip.conf /tmp/cdn-realip.conf.tmp
Obtaining the visitor's IP address
In order to find out the visitor's IP, the proxy server fills the visitor's IP in the "CDN-VSHOSTING-Real-IP" header. However, it is necessary that you configure the web server to trust this header only if the request is made from the ip proxy server, the ip list is shown above.
The configuration might look like this:
nginx:
set_real_ip_from 93.185.110.99;
set_real_ip_from 93.185.110.100;
set_real_ip_from 93.185.110.101;
set_real_ip_from 185.115.0.0/24;
set_real_ip_from 204.145.66.224;
set_real_ip_from 204.145.66.156;
set_real_ip_from 185.198.191.147;
set_real_ip_from 204.145.66.226;
set_real_ip_from 204.145.66.158;
set_real_ip_from 77.81.119.26;
set_real_ip_from 86.105.155.150;
real_ip_header CDN-VSHOSTING-Real-IP;
apache:
RPAFenable On
RPAFproxy_ips 93.185.110.99 93.185.110.100 93.185.110.101 185.115.0.0/24 204.145.66.224 204.145.66.156 185.198.191.147 204.145.66.226 204.145.66.158 77.81.119.26 86.105.155.150 RPAFheader CDN-VSHOSTING-Real-IP
Finding the ip address in php:
function get_realip() {
    $real_ip = $_SERVER[REMOTE_ADDR]
    $cdn_ip = array("93.185.110.99", "93.185.110.100", "93.185.110.101", "204.145.66.224", "204.145.66.156", "185.198.191.147" "204.145.66.226", "204.145.66.158", "77.81.119.26", "86.105.155.150"); if (in_array($_SERVER[REMOTE_ADDR], $cdn_ip)) { $real_ip = $_SERVER[HTTP_CDN_VSHOSTING_REAL_IP]; } return $real_ip; }
Caching time setting
The "Cache-Control" and "Expires" headers can be used to set the time for which the content is cached, "Cache-Control" has wider setting options.
If you want to cache content for a maximum of 10 minutes, you need to set the Cache-Control header as follows:
"Cache-Control: public, max-age=600"
Then we can insert the following configuration into .htaccess or directly into the configuration of the virtualhost in Apache:
<FilesMatch "\.png$">
    Header set Cache-Control max-age=3600
</FilesMatch>
Thanks to this setting, the CDN will cache png files for a maximum of one hour, after the expiration of this time, the CDN will check whether the file has changed at the next request.
Cache Enforce feature
To set the caching time, we can also use the Cache Enforce function in the CDN administration. When this function is turned on, all responses are cached for the set time, including those that would normally not be cached due to the headers.
When this function is turned on, the following headers, for example, are ignored:
- X-Accel-Expires
- Expires
- Cache-Control
- Set-Cookie
But the headers are not changed. The headers (including Set-Cookie) are sent to the client in the form in which they were sent by the backend. So if Cache-Control: no-cache is set, the content will be cached on the CDN for the time set by Cache Enforce, while no caching will occur in the browser.
When using this function, you need to be careful that there is no dynamic content on the domain, or content whose loading is caused by setting cookies using Set-Cookie.
Adding the Cache-Control header - php
To set the Cache-Control header, we use the header function:
header("Cache-Control: max-age=600");
The header function needs to be called before you send any content, so the function needs to be called as early as possible in your code.
GeoIP restrictions
By setting GeoIP restrictions, we can limit website access via CDN to countries that we either allow or prohibit. GeoIP mode works either in Blacklist or Whitelist mode. After selecting the mode, we can choose which states we want to block or allow in the dropdown menu. It is possible to select multiple countries.
Remote Log
Access logs from the CDN can be sent to a remote server for self-analysis, Syslog, RabiitMQ and Loggly are available.
Autoconvert to WebP
This feature allows converting .bmp, .png, .jpg and .jpeg files (respectively files matching this regular expression ".(?:bmp|png|jpg|jpeg)$" ) to webp format for CDN distribution. You can find more information about this format, e.g. here: https://en.wikipedia.org/wiki/WebP . Browser WebP support is detected using the Accept-Encoding header. Browsers that do not support this technology are sent the image in its original format. After turning on this function, it is necessary to wait at least an hour before the converted files are available. This is also related to the setting of the Cache-Control or Expires header, which must be for at least one hour. It can also be set using the Cache enforcement setting in the CDN administration, again at least one hour (3600 seconds). If the images are already cached in the CDN, they must first be removed from the CDN in order for the conversion to take place. see Cache enforcement. Conversion can be turned off by adding the vshcdn-webp-noautconvert=1 argument to the URL, or by setting the VSHCDN-WEBP-NOAUTOCONVERT=1 header on the backend.
When using this function, redirects are followed internally in the CDN and the image is returned to the client with the original url, in case you need the opposite behavior, please contact us using a ticket with information for which domain you wish to reset the given functionality.
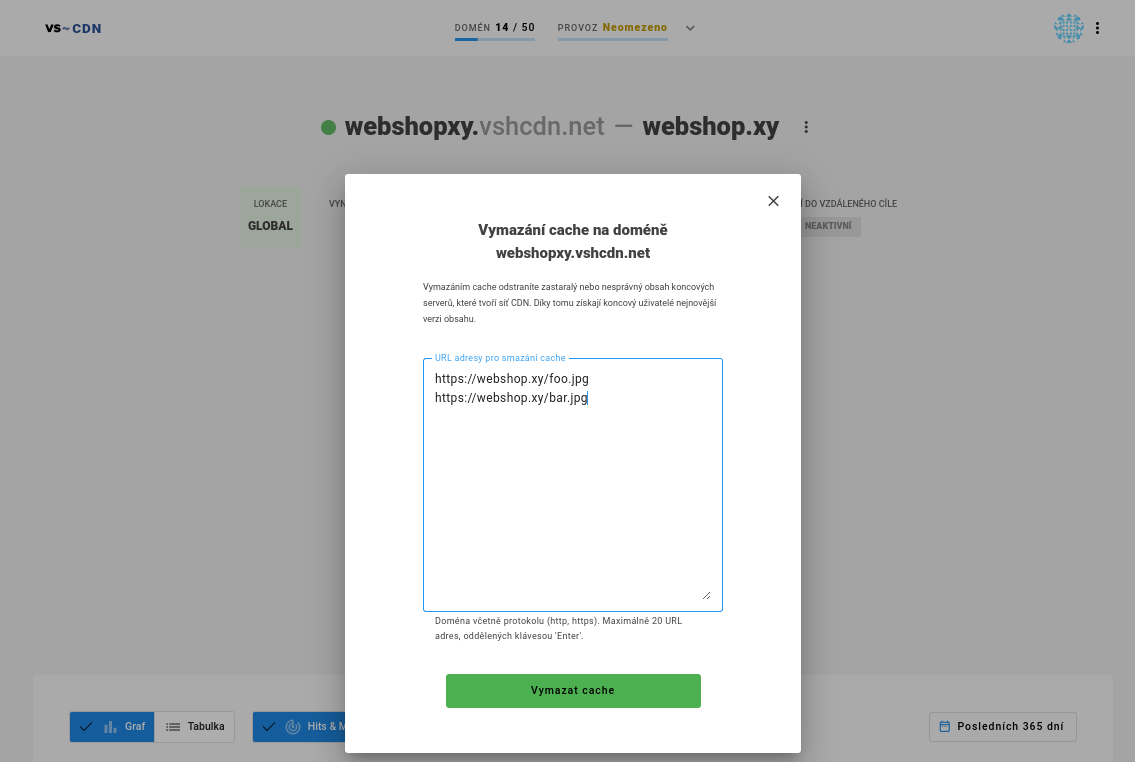
Clear the cache
Through the CDN administration, it is possible to remove the cached URL from the CDN. For each domain, there is a Clear cache option. After clicking on it, you will be offered the option to enter up to 20 URLs to delete. The "" (asterisk, wildcard) character is also supported, allowing you to replace any ending of a URL. If you need to completely clear the cache, be aware that deleting HTTP/HTTPS and aliases is done separately.*
So, if you want to clear the cache for a domain completely, you need to enter the following:
http://domain.vshcdn.net/*https://domain.vshcdn.net/*http://myalias.com/*https://myalias.com/*
If the domain has multiple aliases, you need to enter all of them.